PurposeCreate Assignment Hours Shifts to help refine case assignment recommendations. Create Working Hours Shifts to help identify time overlaps. Review coverage and quickly modify shifts by moving agents across shifts. |
SummarySet up and configure Shifts for your team enables smarter case assignments and better support coverage. Once configured, you can enable Shifts with two basic steps:
|
Enabling Agent Shifts
In order for users to take advantage of Shifts, they need to have two Control Center settings configured:
- Control Center > Settings > User Profiles make sure that the User Profile has Case Assignments enabled for those users.
- Control Center > Manage Users enable the "Manage Shifts" option is enabled.
Once those two quick configurations are made, users will be able to define Shifts in Shift Management under CASE ASSIGNMENT.

Shift Management
Shifts are displayed similar to a project management gantt chart and can be color coded to make them easily identifiable. A few things to note about the Shift Management view:

- Shift Management is located under CASE ASSIGNMENT in the left-hand navigation.
- Working Hours and Missing hours can be toggled on / off using the eye icon in the legend.
- Add New Shift is located in the upper right-hand side of the screen.
Adding Shifts
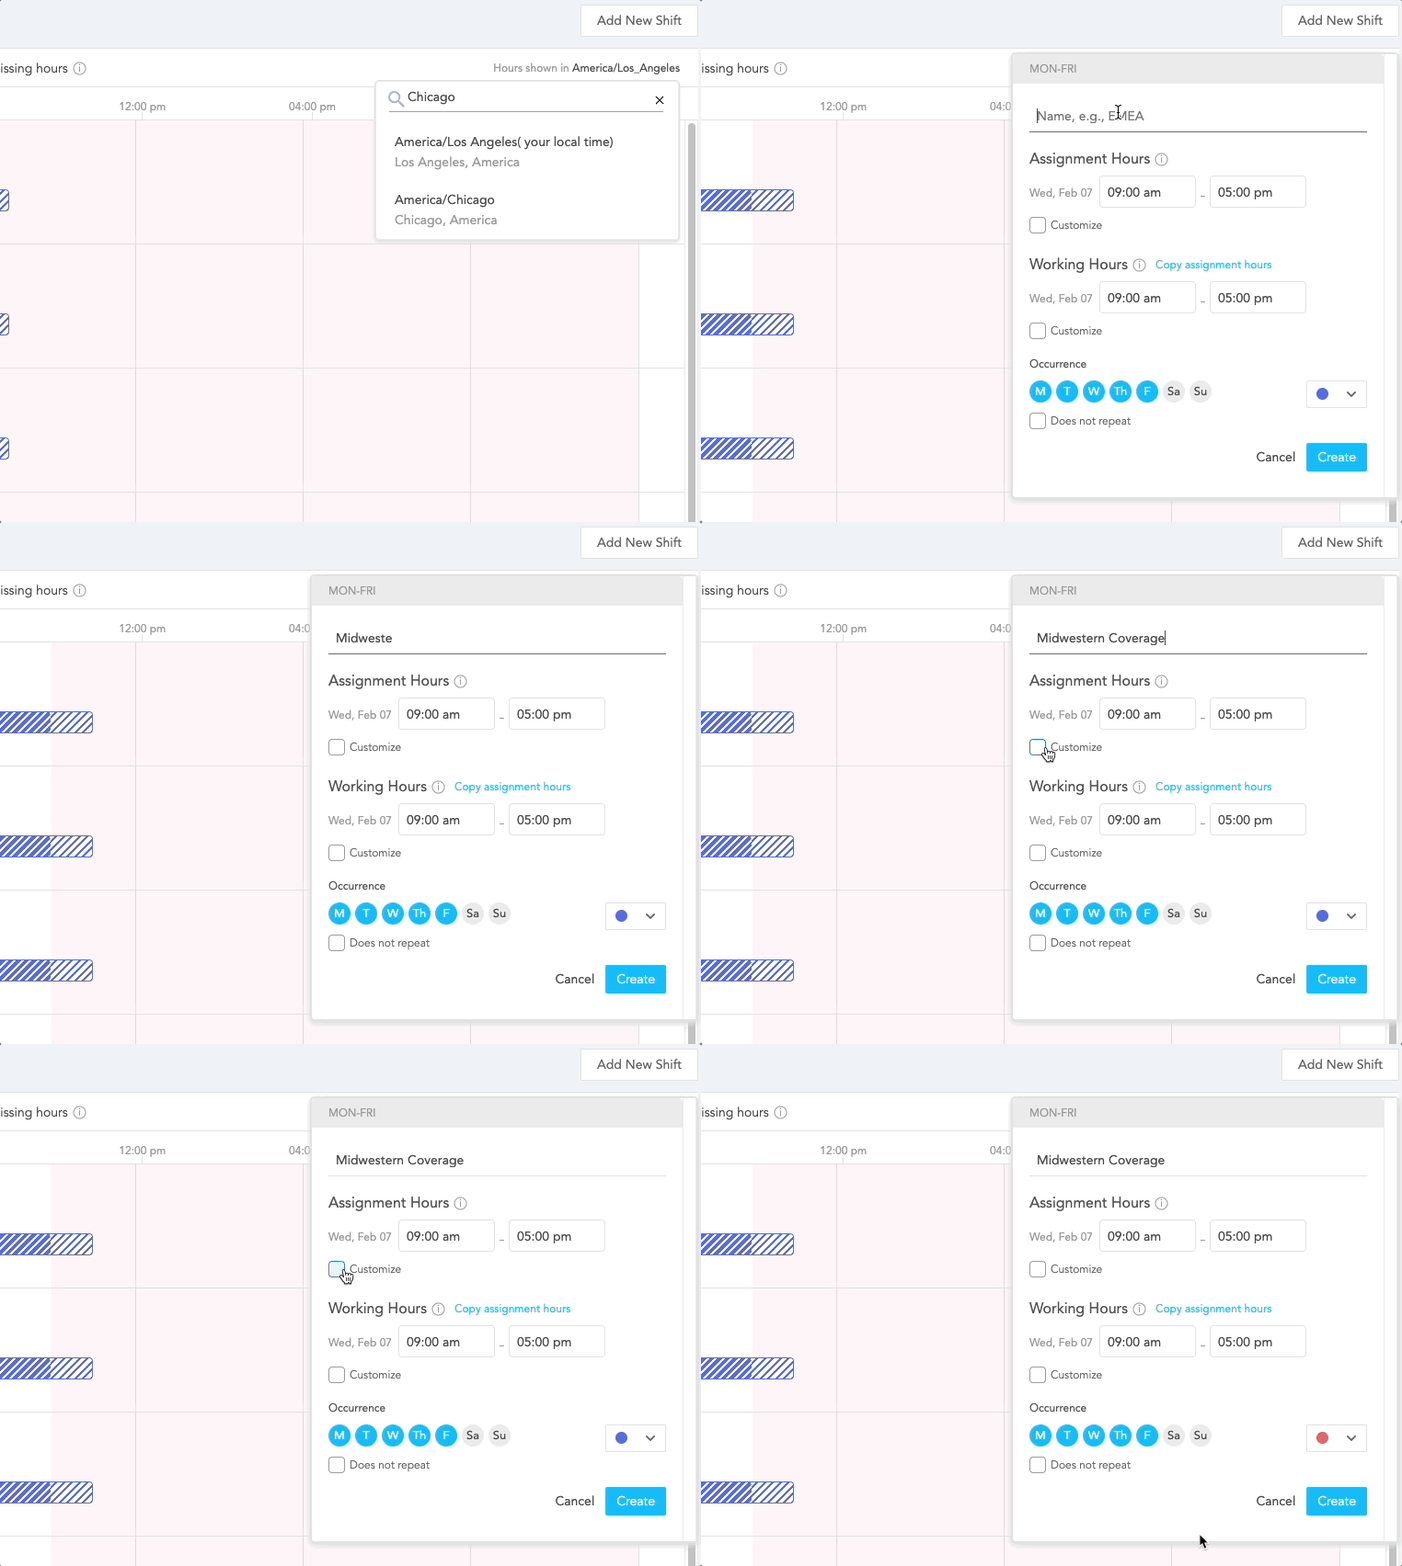
Adding Shifts is quick and simple to do. To create a new shift:
Time Zone Consideration: before adding a new shift, you may need to adjust the "Hours shown in" to align with the time zone of the agent or team of agents you are creating this schedule for (see image below).

- Under CASE ASSIGNMENT of the navigation menu, select Shift Management.
- Then select Add New Shift button.
- In the Shift scheduling dialogue:
- Name the Shift.
- Set the Assignment Hours (these will be based on the time zone selected under Hours shown in).
- Set the Working Hours (using Copy assignment hours to edit these quickly.)
- Optionally, modify Occurrence, select a color-code for this shift, and whether it is a repeating schedule or a one-time modification.
- Select Create

The Does Not Repeat checkbox allows you to create a one off schedule for special events, holidays, or to accommodate any unique scheduling requirement that might arise.
Assignment Hours versus Working Hours
Assignment Hours determine when an agent can be assigned cases as opposed to Working Hours which are intended as the umbrella of hours an agent can work. In most cases you will need to configure complex Assignment Hours to accommodate for the times an agent can be assigned a case that is realistic for them to address given the hours available from their Working Hours (see below):

The example above assumes you are on West Coast time. The Assignment Hours take into account that Agents on the East Coast have a lunch break from 10:00 a.m. - 11:00 a.m. and should not be assigned cases an hour prior to the end of their Shift, which is 3:00 p.m.

So the Assignment Hours allow for 6:00 a.m. until 11:00 a.m. and from 12:00 p.m. until 2:00 p.m. Monday through Fridays.
Assigning Agents
Once you have created the Shifts needed, you will prompted to assign agents. You can leverage Virtual Teams you have previously configured for this step.

Hovering over any of the Shifts provides a summary of the Assignment and Working Hours. You can assign additional agents by clicking on the [Shift Name] | # of Agents above any of the Shifts.
Organize Shifts by Color
With multiple shifts in one view, it may become difficult to keep track of each team. To help differentiate shifts, you can color code each when you setup the schedule. To do so:
- Open a Shift and navigate to the Working Hours section.
- Select the Occurrence and set the color for that shift.
- Click Save.

Shifts created now will be color coded and more easily distinguished when scheduling multiple teams.

Was this article helpful?
That’s Great!
Thank you for your feedback
Sorry! We couldn't be helpful
Thank you for your feedback
Feedback sent
We appreciate your effort and will try to fix the article